
Event driven approach with Lua and Roblox
One of my goals for the holiday season after the school year ended was to explore a new programming language as well as programming concepts. I decided to do that with a visit to my childhood years on a platform called Roblox, as I vaguely remember that Roblox was associated with a language called Lua.
Context
But first, what is Roblox? To summarize it briefly, it is a platform where you can create and play games with a stylized graphics that resembles lego blocks (Hence the "blocks" in Roblox). One of the most interesting thing about Roblox, and arguably what sets it apart from other similar games (there are plenty of games with such an aesthetic out there) is that Roblox enables you to create your own games in their engine.
This is not just limited to building legos, it includes programming (or "scripting", a term more commonly used in Roblox) in Lua to enable various functionalities in your creation. In that sense, Roblox is not just a game platform, but also a game engine like Unity and Unreal Engine.
The First Project
I decided to start with something small to explore the Roblox API as well as to learn the basics of Lua. Instead of trying to realize an ideal of a full-fledged game (which I would probably never finish), I decided to make a mini puzzle which I was very familiar with: the lock puzzle that in present in the Contact tab of my portfolio website.
Event-driven Programming
The phrases "event" and "event handler" were things I've definitely heard of before in web development, but I did not focus much on the implications of what they meant. In Roblox, there is a higher emphasis on the concept of events and event handlers, as many things in Roblox are event-driven.
You have probably done event-driven programming and dealt with events and event handlers too if you are a web developer. Let me give you a simple example: an onClick() function, which is an event handler that executes when a button is clicked (an event is fired).
We will see how event-driven programming is used in Roblox to create the simple lock puzzle below.
Puzzle Structure & Mechanics
There were 3 main components to this puzzle: the lock, the unlockers, and the reset button. In Roblox, I made the lock as a door, and the unlockers and reset button as pads that the player can press down on.
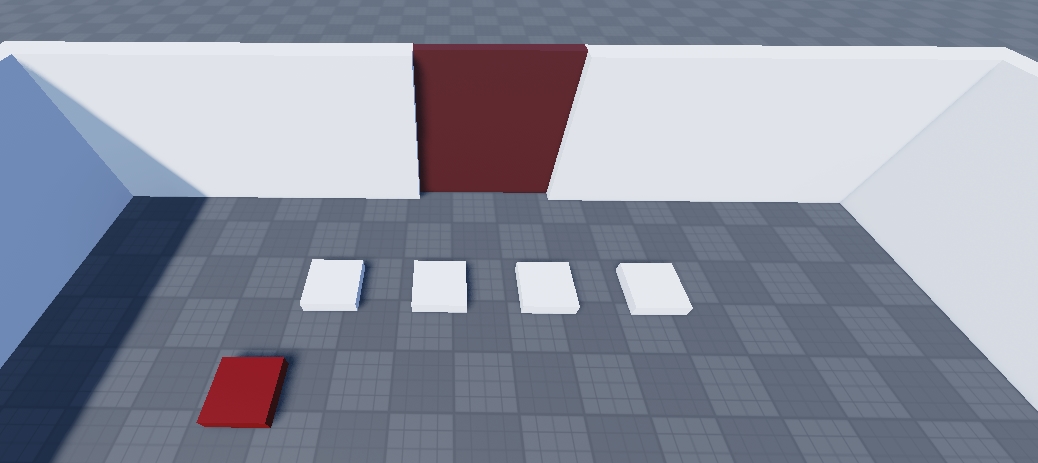
How the door, unlockers and the reset button look like in Roblox.
This is the basic idea behind the mechanism:
- Generate a 4-digit number with each digit being a number from 1 to 4 with no duplicates. This is the secret sequence, which represents the order in which we have to press the unlockers (each unlocker is assigned a number).
- Light up the unlocker pads in the order of the secret sequence.
- When a player presses down on an unlocker pad (this is an event!), we will have an event handler that concatenates the pad's assigned number to a user input variable.
- When the user input length is 4 (i.e. all pads have been pressed), we will check if the user input matches the generated secret sequence. If it does, the door will open. If not, the door will remain closed and turn red.
Implementation
First, here is the structure of the model in Roblox:
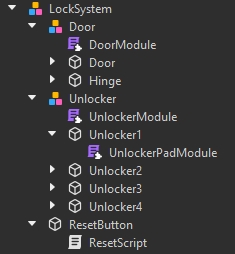
Note how each relevant script is inside their respective parts.
Here is a summary of what script corresponds to what parts:
- DoorModule: Handles opening of door based on event received from the UnlockerModule (if user authenticated successfully)
- UnlockerModule: Handles generation of secret, receiving input events from the unlocker pads and sending authentication event to the door.
- UnlockerPadModule: Handles receiving input events from the player and sending input events to the UnlockerModule. Each unlocker pad contains this script.
- ResetScript: Handles input event from the player and resets the state of the entire model (door, unlocker pads, re-generate secret sequence).
As the code can be quite verbose, we will only go through the essential parts of the script with the main functionalities, although I have included the full code for completeness.
UnlockerPadModule
Let us take a look at the contents of UnlockerPadModule in the pad named Unlocker1:
local onTouch1 = {}local bindableEvent = Instance.new("BindableEvent")onTouch1.Hit = bindableEvent.Eventlocal unlockerPart = script.Parentlocal debounce = truelocal function onTouch(touchedPart) local partParent = touchedPart.parent local humanoid = partParent:FindFirstChild("Humanoid") if humanoid then if(debounce) then unlockerPart.Color = Color3.fromRGB(10, 40, 210) bindableEvent:Fire() debounce = false end endendfunction onTouch1.resetDebounce() debounce = trueendfunction onTouch1.lockDebounce() debounce = falseendunlockerPart.Touched:Connect(onTouch)return onTouch1
There are only 3 note-worthy things to mention amidst all the syntax. First, the second-last line uses Roblox's API to check for the event where a player touches our pad, then binds an event handler to it (onTouch).
Second, in the onTouch function, we check if the part that touched our pad is a humanoid (i.e. a player), and if so we fire a custom event that we created (bindableEvent) which will be handled in UnlockerModule. This essentially acts as a communication channel between the two scripts.
Lastly, you may have noticed a variable named debounce. Debounce is an important pattern in event-driven programming to prevent the same event from being fired consecutively too many times. In this case, we only want them to be able to press the pad once, so we set debounce to false when a player presses the pad to prevent subsequent firing of the event. See here for more details regarding the debounce pattern.
Each unlocker pad contains this script, so all of them will fire off separate events to be handled differently.
Now let us examine how the UnlockerModule handles the custom event. There is quite a bit to unpack, so feel free to skip past the code and read what the explanation highlights below.
local unlockerModule = {}local Unlocker1 = script.Parent.Unlocker1local Unlocker2 = script.Parent.Unlocker2local Unlocker3 = script.Parent.Unlocker3local Unlocker4 = script.Parent.Unlocker4local unlocker1Hit = require(script.Parent.Unlocker1.UnlockerPadModule)local unlocker2Hit = require(script.Parent.Unlocker2.UnlockerPadModule)local unlocker3Hit = require(script.Parent.Unlocker3.UnlockerPadModule)local unlocker4Hit = require(script.Parent.Unlocker4.UnlockerPadModule)local bindableEvent = Instance.new("BindableEvent")unlockerModule.authenticate = bindableEvent.Eventlocal userInput = ""local function generateSecret() local secret = "" local secretTable = {"1","2","3","4"} for i=1, 4 do local randomIndex = math.random(#secretTable) local randomElement = secretTable[randomIndex] secret = secret .. randomElement table.remove(secretTable, randomIndex) end return secretendlocal generatedSecret = generateSecret()local function authenticate() if(string.len(userInput) == 4) then if(userInput == generatedSecret) then bindableEvent:Fire(true) else bindableEvent:Fire(false) end endendlocal function animatePart(c) local unlockPart if c == "1" then unlockPart = Unlocker1 elseif c == "2" then unlockPart = Unlocker2 elseif c == "3" then unlockPart = Unlocker3 else unlockPart = Unlocker4 end unlockPart.Color = Color3.fromRGB(10, 40, 210) wait(0.5) unlockPart.Color = Color3.fromRGB(237, 234, 234) wait(0.5)endlocal function animateSecret(number) for i=1, #number do local c = number:sub(i,i) animatePart(c) endendanimateSecret(generatedSecret)function unlockerModule.reset() userInput = "" Unlocker1.Color = Color3.fromRGB(237, 234, 234) Unlocker2.Color = Color3.fromRGB(237, 234, 234) Unlocker3.Color = Color3.fromRGB(237, 234, 234) Unlocker4.Color = Color3.fromRGB(237, 234, 234) lockPads() generatedSecret = generateSecret() wait(1) animateSecret(generatedSecret) unlockPads()endfunction lockPads() unlocker1Hit.lockDebounce() unlocker2Hit.lockDebounce() unlocker3Hit.lockDebounce() unlocker4Hit.lockDebounce()endfunction unlockPads() unlocker1Hit.resetDebounce() unlocker2Hit.resetDebounce() unlocker3Hit.resetDebounce() unlocker4Hit.resetDebounce()endunlocker1Hit.Hit:Connect(function() userInput = userInput.."1" authenticate()end)unlocker2Hit.Hit:Connect(function() userInput = userInput.."2" authenticate()end)unlocker3Hit.Hit:Connect(function() userInput = userInput.."3" authenticate()end)unlocker4Hit.Hit:Connect(function() userInput = userInput.."4" authenticate()end)return unlockerModule
Let us focus on the most important parts of the code. The last 4 chunks of the code are the event handlers for the custom events fired by the unlocker pads. They simply append the number of the pad to the userInput variable, and then call the authenticate function.
Inside authenticate function, we check if the userInput is 4 characters long. If so, we check if it matches the generatedSecret; if it does, we fire a custom event (bindableEvent) with a boolean value of true, and if it doesn't, we fire a custom event with a boolean value of false. This event will be handled by the script called DoorModule which decides whether to open the door or otherwise:
local doorModule = {}local unlockerModule = require(script.Parent.Parent.Unlocker.UnlockerModule)local Door = script.Parent.Doorlocal hinge = script.Parent.HingedoorModule.locked = truelocal TweenService = game:GetService("TweenService")local tweenInfo = TweenInfo.new(1, Enum.EasingStyle.Linear)local rotatedCFrame = hinge.CFrame:ToWorldSpace(CFrame.Angles(0, math.rad(-70), 0))local goal = {}goal.CFrame = rotatedCFramelocal doorOpen = TweenService:Create(hinge, tweenInfo, goal)local closeCFrame = hinge.CFramelocal goalClose = {}goalClose.CFrame = closeCFramelocal doorClose = TweenService:Create(hinge, tweenInfo, goalClose)function unlock(authenticated) if(authenticated) then --Open the door doorOpen:Play() doorModule.locked = false else --Wrong code. Highlight door as red Door.Color = Color3.fromRGB(255,0,0) endendfunction doorModule.resetDoor() Door.Color = Color3.fromRGB(86,36,36) if(not doorModule.locked) then doorClose:Play() endendunlockerModule.authenticate:Connect(function(authenticated) unlock(authenticated)end)return doorModule
In the second last line of the script, we connect the custom event fired by the UnlockerModule to the unlock function. The unlock function simply checks if the received boolean value is true or false; if it is true, it opens the door, and if it is false, it highlights the door as red.
At this point, once the door is either unlocked or turns red, the player can no longer interact with the unlocker pads, as we have mentioned earlier that we only want the player to be able to press the pads once.
This is where the ResetScript comes in, which resides inside the ResetButton:
local doorModule = require(script.Parent.Parent.Door.DoorModule)local unlockerModule = require(script.Parent.Parent.Unlocker.UnlockerModule)local ResetButton = script.Parentlocal debounce = truelocal function reset(touchedPart) local partParent = touchedPart.Parent local humanoid = partParent:FindFirstChild("Humanoid") if humanoid then if debounce then debounce = false ResetButton.Color = Color3.fromRGB(237, 234, 234) doorModule.resetDoor() unlockerModule.reset() ResetButton.Color = Color3.fromRGB(117, 0, 0) wait(1) debounce = true end endendResetButton.Touched:Connect(reset)
It is fairly simple, just like the unlocker pads. It simply calls the reset function of the DoorModule and the UnlockerModule when the player touches it. Once again, we see the debounce pattern where the debounce variable is used to prevent the player from spamming the reset button.
And that's about it! Here's a video of the final product:
There are some other considerations that I did not explain, such as the animation and locking of the pads (feel free to examine the code to see how it works!). Locking of the pads is tied to the debounce variable, and is especially important when you consider scenarios where you want to prevent the user from triggering the pad events while the animation is playing.
Closing Thoughts
So we have made a functional lock puzzle, and we've seen how events are critical for communication between different modules and scripts to make the system work; different components fire off events that can be handled internally or by other components. However, the system can be improved. There are some potential problems with the current state of the system:
- Code Duplicity: Notice how the UnlockerPadModule needs to be in every unlocker pad, and it is the exact same script.
- Scalability: What if we want to add more unlocker pads? We would have to copy the UnlockerPadModule script to every new pad, and we would have to change the unlockerModule script to include the new pads and write event handlers for all of them. We would also have to do the same for the animation functions which are hard-coded based on the number received.
As of writing this post, I have refactored the system to address these issues, and will highlight the process in a follow-up post. Stay tuned!
Comments